Getting Started
Before you approach a computer
Before you even approach a computer to start coding, make sure that
you do the following:
- Understand the nature of the tasks we ask you to
complete. Given that volume rendering is not familiar territory, it is
possible that you end up solving the wrong problems (and getting no
credit for your effort). Don't let this happen to you, so please
start early and come see us if you have any
questions.
- Read carefully the files src/octree.h and
src/vrender.h, residing in the class project directory.
These contain a complete description of the interface by which your
octree implementation should abide, as well as documentation on our
provided supporting code. It is important to understand the
practical requirements that implementation places upon your abstract
algorithms; these include the following two critical points,
which were not addressed in the project description:
- The global variable MaxDepth controls how far down the
octree GetOctreeValue() and OctreeTraceRay()
descend. In other words, both functions treat the octree as if all
nodes below depth MaxDepth, the maximum traversal
depth have been pruned (the root has depth zero).
- In the computer, unlike in abstract math, floating point
computations have roundoff errors, and CellTraceRay() may
miss intersections. Make sure your code can robustly handle floating
point roundoff errors and their consequences.
- Experiment with the provided bin/vrender demo
executable. Detailed instructions on how to run the volume
rendering system are given later: henceforth, and unless otherwise
stated, vrender refers to both your compiled implementation
(either vrender or vrender_d) and to our demo
executable.
- Design your algorithms, and solve the
pencil-and-paper tasks (1, 2, 6, and 8).
- Make sure that you plan ahead to completing both
your octree implementation and its documentation; see
the information on project submission for
details on the required documentation.
Setting up your account
When you are ready to start coding, and after you have settled on
project partners, it's time to start developing your project. To this
end, set up your account by following the steps below:
- Log on an epic.
- If you plan to work with a partner, make sure you have an AFS
account. To this end, type
printenv HOME
If the reply starts with /afs/, proceed to the next step;
otherwise, contact Distributed
Computing Consulting and ask them to incorporate your account
under the AFS hierarchy.
- cd to the directory which should be configured to
contain your project subdirectory.
- Make sure you have at hand the logins of your partners, if
any.
- Type
/afs/ir.stanford.edu/class/cs161/97summer/project/do setup
and follow the instructions on the screen.
Your account is now ready. In the newly created subdirectory
cs161_project, you will find these files and
subdirectories:
- A C or a C++ file - named octree.c or
octree.cc, respectively - which is the template of your
octree implementation. You will fill in this file with your code.
Do not rename this file; also, do not modify
the given template outside the indicated sections.
- A link to the do script. You will use do to
compile, evaluate and submit your code.
- A subdirectory obj_d, which will be the cache for
object code generated by the compiler for debugging purposes.
- A subdirectory obj, which will be the cache for object
code generated by the compiler for testing purposes.
Starting to write code
In the files src/octree.h and src/vrender.h, you
will find a complete description of the interface by which your octree
implementation should abide, as well as documentation on our provided
supporting code. The following outline describes how your code and
ours interact:
- Our code loads a raw volume (i.e. a volume in a 3D array
representation) from disk.
- Our code calls your BuildOctree() function once and
only once, sometime before it invokes any other octree operations.
- BuildOctree() creates the octree, and stores it in
variables local to your implementation (i.e. static within
octree.c or octree.cc). In the process, it
reads, but does not modify, the global variables set by our code; it
does this either directly (e.g. reading VarianceLimit or
Size) or via macro calls to our code (VOXEL()).
- When your implementation returns from BuildOctree(),
our code will do one of the following:
As discussed in the provided src/octree.h, your code may
call our exported functions and macros, declared in
src/vrender.h, and read, but not write, our exported global
variables.
Rendering a volume
When you invoke the executable vrender with the -tst
r command-line argument, it renders a volume from one or more
viewpoints. This rendering process is controlled by the following
parameters, which you must supply to the standard input of
vrender:
- The base name of the output image files. The name of each
generated image file will be the base name, followed by a three-digit
number (from 000 onwards), and ending with the extension
.pgm, identifying the image file format. Example: with a
base name of horse, the first image will be saved in
horse000.pgm, the second in horse001.pgm, etc.
- The image scaling factor and size. You have two options:
- An Automatic image scaling factor will render your
volume in such a way that the whole cube will fit in the image
area. In this case, you specify the horizontal or vertical pixel count
of the resulting image (whichever is longer), and vrender
figures out how long the other dimension should be.
- You can also set a numerical scaling factor; in this case, you
also specify the pixel count along both dimensions of the resulting
square image. The scaling factor specifies the image dimensions in the
coordinate space of the volume. For example, a factor of 1 makes the
image focus on (approximately) a single voxel, while a factor of L
(usually) fits the whole volume nicely and tightly within the image.
- The maximum traversal depth. Instead of supplying this number
directly, you supply a number R (the depth reduction), from
which MaxDepth is computed as log2L-R. In words,
you specify at which height over the leaves of a complete octree
OctreeTraceRay() should prune its traversal.
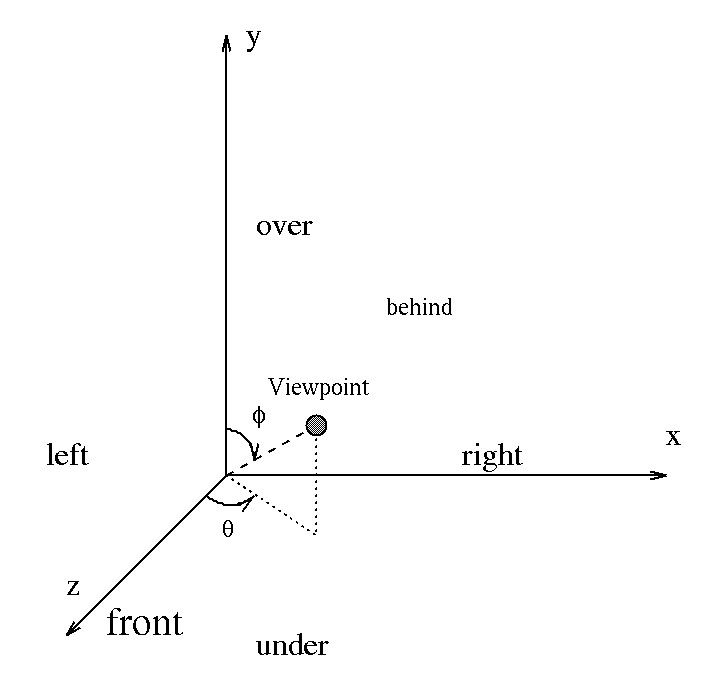
- A sequence of viewpoint positions. The coordinate system used to
define each viewpoint position is shown below:
You supply pairs of values for phi and theta, in degrees, one pair per
viewpoint. Caution: the coordinate system in the
figure above is rotated relative to the coordinate systems in all
other figures.
Although it is not necessary to invoke vrender manually to
render images (see below), if you choose to do so, you will find
helpful the vrender command-line arguments. Type
vrender -help
to get a list of the command-line arguments that vrender
recognizes. In short,
- -vol sets the full filename of the input volume; it is
required;
- -var sets the variance limit for lossy compression;
- -tst directs the action taken by our code after the
octree is built (see above).
Also, if you want to avoid typing the same rendering parameters time
and again, use the /usr/bin/echo command (which is not the
same as the echo command of the shell); for example,
/usr/bin/echo 'image\n64\n200\n0\n90\n0\n' | \
vrender -tst r -var 0 \
-vol /afs/ir.stanford.edu/class/cs161/97summer/project/data/sphere64.vol.gz
renders a frontal view (phi is 90, theta is 0) with scaling factor 64
of the sphere demo volume with L=64, using an octree with lossless
compression and no depth reduction, and storing the result in the 200
by 200 image file named image000.pgm.
You can render a volume without ever invoking vrender
manually; just run do image or do movie,
instead. Both use the executable vrender present in your
cs161_project directory, so if you want to use the demo
executable, you must copy bin/vrender into your
cs161_project directory first.
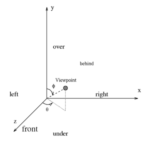
do image allows you to set the viewpoint in a simpler, but
more limiting, way than vrender: you just form a
combination of the first letters of the words "over", "under", "left",
"right", "front", and "behind" (see the above diagram) to position the
viewpoint relative to the volume. Caution: the human
and orangutan volumes are oriented in a nonstandard manner,
i.e. "over" etc. yield unintuitive results when you render these
volumes.
do movie creates a collection of images, with the viewpoint
always lying on the x-z plane, and slowly rotating about the y axis
towards increasing theta. To turn your image sequence into an MPEG
movie file, follow the steps below:
- Log on a fast Silicon Graphics workstation; there are 18 of them
in the basement of Sweet Hall (named firebird1 through
firebird18).
- Convert the movie frames, one at a time, into the Silicon
Graphics rgb image format using the pnmtosgi
program. We recommend you write a script to do that for you: it's an
awfully tedious process.
- Assemble your images into an MPEG movie using the
mediaconvert program.
- Finally, you may use movieplayer to playback and
preview your movie.
Compiling and debugging
When you have written some code and you are ready to try it out, just
type
do compile
in your cs161_project directory. If you get the infamous
error
do: Command not found.
add the current directory . - just a single period - to
your path definition in your ~/.cshrc file.
The above command compiles your code, generating two executables, both
in the same directory:
- vrender_d, which can be subjected to debugging using
dbx or gdb, and
- vrender, which is fully optimized, and which
do uses to evaluate your implementation.
Once you've successfully compiled your code, execute do
test to run a few simple correctness checks on your code. For
the most part, do test runs your implementation and ours
side by side; whenever the two implementations produce different
results, do test prints a failed message and
exits.
Here is some advice to heed as you develop your code:
- do test does not run exhaustive
tests. In particular, it hardly exercises your code's ability
to handle floating point roundoff errors. For grading purposes, we
will use a significantly more elaborate test suite. To make sure your
code passes our final tests, we encourage you to design and write
additional testing code, as follows:
- add your test code within your implementation of
PrintOctree(), and
- execute your vrender using the -tst s
command-line argument.
- Although the original template file octree.c or
octree.cc will compile successfully, it will fail do
test. The reason is that the template file does not
contain a functional implementation.
- do tries to compile your code quickly by caching
information from previous compilations. That is, different code
modules are compiled into separate object files which need only be
regenerated when the associated source module is modified. This
caching is achieved by using a Makefile - residing in the
class project directory under the src subdirectory -, whose
internals you need not worry about. However, as artificial
intelligence is a myth, caches can (very rarely) become corrupt or
out-of-date; in this case, you may manually remove all
caches by executing do clean.
- If do exits with an error message starting with
Couldn't execute vrender:
first try the do clean command, and recompile. If the
problem persists, you are in trouble...
Every quarter, students (including us) are plagued by segmentation
faults (or bus errors; also known as core
dumps) while they develop code. These bugs are hard to trace:
most commonly, they can be attributed to illegal memory accesses,
i.e. writing in memory that the operating system has not reserved for
your use. What's hard to trace is where in your code the illegal
access took place: often, if not always, the code will merrily
continue executing for long after the illegal access, only to realize
much later that memory had been corrupted in the distant past and that
further execution is impossible. And this realization might occur
while our code is running, even though your code
committed the illegal access. The bottom line is: if your code
dumps core and the debugger says it died in our code, then the fault
is still somewhere in your code - do not look for it
elsewhere.
- Code debugging is your responsibility. We cannot
look at any student's code to find out where or why it fails. The
reason is that this is a very time consuming task, and it is thus
impossible to help all students equally and fairly. And past
experience has shown that you know your code much better than we do,
and after a nap, you end up figuring out your bugs in a few
minutes, all on your own.
However, if you have any questions concerning the
algorithmic correctness of your implementation, please come
see us. Such questions include: Have I forgotten to check for
any special cases in my control flow? Can I make this assumption on
the return value of your code? Is my analysis of expected running time
correct?
Performance tuning
Having debugged a basic implementation of your octree management code,
you are ready to start evaluating and improving the performance of
your code. To this end, first compile your code. Then, run do
image to render a volume from a viewpoint of your choice, and
save the result in an image file; you can view this file by typing
xv followed by the file name. The full pathname of
xv is
/usr/pubsw/X/bin/xv
just in case your file search path is nonstandard. Your code's
performance is reported on the line starting with
Rendering....
To assess the performance of our implementation and compare it to
yours, execute our demo executable using do image, as
outlined earlier. The reason we are not giving you any performance
numbers is that the load on Sweet Hall machines varies a lot from
minute to minute, due to the presence of multiple users on a single
workstation. For your information, your code will be graded on an
epic running in single-user mode, so load variations will
not cause unfairness in grading.
Your code will be graded using our grading version of the
do script, which compiles your code using our provided
Makefile. No other optimization flags - besides those in
our Makefile - will be used for compiling and linking your
code during grading. Also, we will measure your performance using
several different variance limits, maximum traversal depths, and
volumes (not all of which were given to you as demo volumes).
Before you start optimizing your code, make sure you have written a
good, reliable, debugged version first. It's true that optimization
may introduce new bugs, but having a working version is crucial to
getting a good grade: after all, optimization is only worth 5 points,
while correctness is worth a lot more. One cautionary note for
die-hard hackers: inline assembly, although allowed, is probably a
waste of time since
- modern compilers produce much better machine code that people,
- trying to maintain and debug inline assembly is a pain, and
- your choice of algorithms, as well as the quality of your writeup,
matter much much much more than low level coding.
Still, providing reasonable hints to the compiler, e.g. via clever
loop reordering or using the register qualifier, is a good
compromise between the competing attitudes "the compiler knows it all"
and "the compiler knows scrap". For tips on code optimization, we
recommend the following sources:
- Bentley, Jon Louis. Programming Pearls.
Addison-Wesley: Reading, MA, 1986.
QA76.6.B453 1986
- Bentley, Jon Louis. More Programming Pearls: Confessions
of a Coder. Addison-Wesley: Reading, MA, 1988.
QA76.6.B452 1988
- Bentley, Jon Louis. Writing Efficient Programs.
Prentice-Hall: Englewood Cliffs, NJ, 1982. On-line
summary.
QA76.6.B455 1982
Non-standard development
If you want to develop your code on any other platform, or with the
aid of tools beyond the ones described above, you are on your
own. Here are some hints to help you get started; recall
that, no matter how you develop your code, you must submit code that
compiles and executes - producing correct results - on an
epic, using our do script:
- Our Makefile relies on some external environment
variables (which do provides). So, if you want to (copy
and) modify our Makefile - in order to use a debugger other
than dbx or gdb, for example - you need to
define the following environment variables:
- CLASS: it should point to a directory mirroring the
contents of the class project directory.
- OBJ_DEBUG: it should point to the cache for object
code generated by the compiler for debugging purposes.
- OBJ: it should point to the cache for object code
generated by the compiler for evaluation purposes.
- CC: it should be the full path name of the program
that compiles your code.
- GPP: it should be the full path name of the C++
compiler and linker.
- STUDENT: it should be the full path name of the file
containing your octree implementation.
- If you wish to develop your code on another machine, or on a
local directory of a Sweet Hall Sun workstation - avoiding regular
access to the class project directory - then you need to do some work:
- Make sure your platform has the necessary software installed. For
example, if you plan to use the do script, you need PERL, and if you plan to compile your
code using do, you need gcc or g++.
- Copy the contents of the class project directory onto your local
system. As we may modify the files in the class project directory in
small ways, you are encouraged to update your local copies regularly.
- You may do your development without using the do
script; in this case, simply configure the provided
Makefile directly, following the above instructions.
- If you choose to use the do script, edit appropriately
the section entitled "ENVIRONMENT SETUP", and possibly edit the host
check in the second part of the "ERROR CHECKING" section.
© 1998 Apostolos Lerios