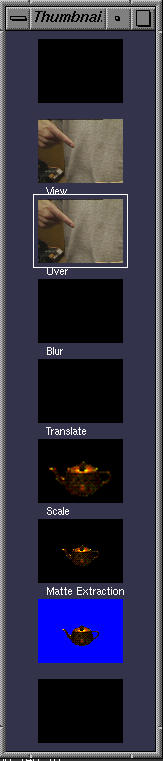
The effects framework allows you to combine source movies and images using the plugins you will write. This document steps you through the creation of a movie. Notice that on the left we have a window containing small images. These images represent our image operation pipeline at different stages. Each stage of the pipeline uses one plugin to modify the video stream in some way. The pipeline is processed from bottom to top, so that our first source movie is at the bottom, and our final output is at the top. There is also one blank layer at the bottom, and another at the top. These spare layers just aren't in use at the moment. There is also a window which shows you the current layer at full size.
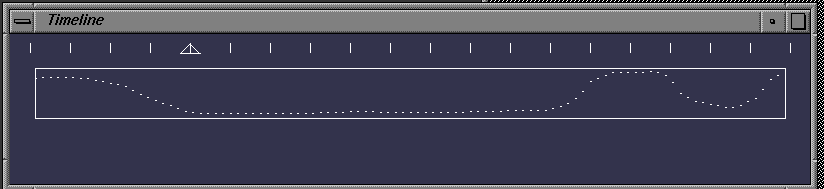
Timeline Window
The remaining window is the Timeline window. This is the window shown
at the very top of this page. There are two main interactions in this window.
At the top you can see a series of hatch marks. Each of these represents
one frame in a movie. Clicking on a different hatch mark, will change your
current viewing to a different frame. You might be using multiple movies.
They all stay in sync. When you click a new frame, everything updates.
The second item of interest is the box below the frame selecter. This box
is the time varying parameter input . It allows you to graphically control
a floating point parameter that is input into all plugins. Its range is
0.0 to 1.0. For example you might use it to control the amount of blurring
to apply, or the ratio of images A and B in a blending operation. By changing
the shape of this input, we can have plugins that vary their operation
over time. There is also a menu on the right mouse button which allows
you to select certain preset shapes of the time varying paramter.
Starting Up
When you first start the effects package, the thumbnail window (with
all the small images) only has one layer. Lets give ourselves some
room to work by choosing the Add Layer option a bunch of times from the
popup menu on the right mouse button. Note that we can also Delete Layers
if we like.
Loading the Teapot
Using the first mouse button select some layer near the bottom of the
thumbnail pipeline. (The white border indicates the currently active layer.)
Then choose R-Open Movie menu option(where I'll use R- or M- to indicate
whether something is on the right or middle menus). This puts a prompt
in your console window, at which you can enter a file name. I've used teapot.mv.
You should now have something similar to the frame below.
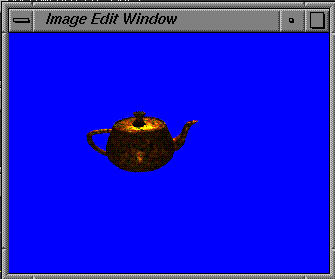
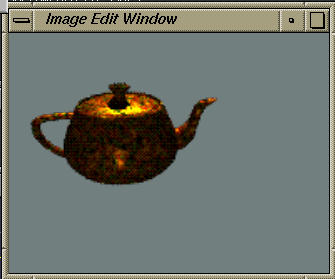
Matte Extraction
Now that we've loaded a movie, select the layer just above. Since I
have previously written a plugin to extract the teapot from a blue background,
I can choose M-Matte Extraction as the operator for this layer. Things
percolate up the operation pipeline, and in this case the image just below
containg the teapot is input into the Matte Extraction plugin, and we should
see the output on this layer. We can see this below.
Scaling
Again selecting the layer just above, we are going to add the next
operator to our pipeline. Select M-Scale. The scale operation receives
its input from whatever is below it on the pipeline. In this case, the
output from the Matte extraction, is input to Scale. The output from scale
is shown in this layer, and also passed up the pipeline. The scale plugin
uses the input from the time varying parameter graphical input in the Timeline
window to control the amount of scaling. Since we want a constant size
scale, we choose the 0.5 option in teh timeline menu. You could also draw
a curve the suits you if you wanted the size of the teapot to vary over
time.
Translation
Now we want to change the location of the teapot in our window. By
applying the M-Translate plugin to the next layer, we can achieve this.
Note that our translate plugin asks for an X,Y displacement with a
console dialog. This prompt will appear whenever you reselect translate,
so you can just select it several times, until you obtain the offset you
desire.
![]()
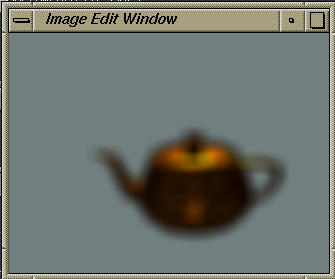
Blur
We would like to apply a time varying blur to the teapot. Fortunately
the blur operator has the blurring radius hooked up to the graphical time
varying input selecter. I chose ramp up from the timeline menu so that
the teapot will range from no blur at the start of the movie, to very blurred
at the end. Of course I could draw by hand a curve representing the
amount of blurring at each time step if I desired.
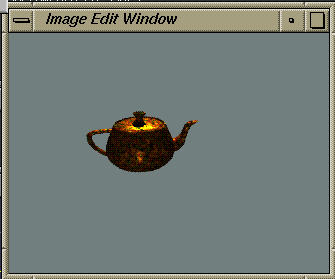
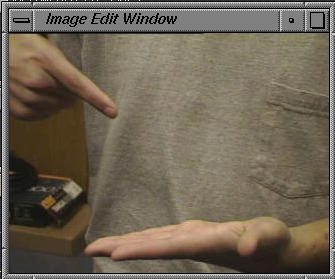
Compositing with Over
The next operation we apply is a bit different. We would like to composite
the teapot over another movie. The Over plugin takes two inputs. One input
is the current imagery which has percolated up the operation pipeline from
below. In this case the operation below outputs the blurred teapot. The
other input to a two input operation like Over, comes from whatever is
in the current layer. First lets select the M-Over plugin. Then choose
R-Open Movie, to select the contents of the current layer. I opened lucas.mv.
Since we are already storing one of the inputs to Over in this layer, the
output from Over can not be stuffed into this layer for visualization.
It is however passed up the pipeline as usual. This point can be a bit
confusing. Plugins that take one input, just use the pipeline value from
below, and let you see the output by stuffing it into the current layer.
Some plugins need two inputs, so in addition to the pipeline value, we
use whatever is in the current layer. This means we can't stuff anything
back into it, but the operation does happen even though we dont see the
output. Its on the pipeline. Below we see a frame from the movie we opened.
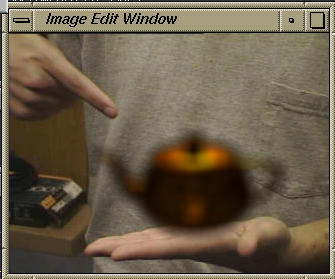
Viewing
We now have our final image on the pipeline, but we can't see it anywhere.
Fortunately there is a plugin that helps. Choose R-View. This allows us
to see the contents of the pipeline. It just takes the input coming up
from below, and doesnt do anything to it. The result of not doing anything,
is the same as the input from below, and this is stuffed into the current
layer, so that we can see it. This same input with nothing done to it,
is stuffed onto the pipeline for use by things above. Below we see an image
of the teapot composited over lucas.
Saving the movie
Now we can save our masterpiece. Choose R-Save Movie and enter a filename.
This will take a little while (about 5 minutes) since each frame needs
to be processed by the whole pipeline of operations. As each frame is completed
it is shown.
The (none) operator
Some layers might have the (none) operator selected. This is mandatory
on the bottom layer, since there is no pipeline below to get input from.
Any layer with none selected does not invoke an operator, but instead copies
its contents onto the pipeline for use by things above.